
Happy St. Patrick's day!!!
Ok, ok, I know Valentine's Day was just yesterday, but I wanted to get these fun projects up so you can make them and have plenty of time to display them to make it worth your while!
First off, I'm going to show you a door hanger that I got from Wood Creations in N. Utah {but basically it is a clover with a slightly smaller bead-board clover on the top}. Because of the bead-board on the top, you are limited to what you can do. I want to find some cute small clovers like 2 inches big and add them to the top part, but I haven't gotten them yet {when I do I will add an updated pic.}. To make the hanger, I just used 3 pieces of 20 gauge wire and put it through the holes. Then I twisted the ends with a pencil to make it look cute. This took, 20 min to make while I was watching tv.


Next up is my 4 leaf clover explosion!

First, find a friend who wants to make this with you {okay you can skip that step, but that was my first step}. Emily thought this was a super cute project too, so off we went to Joann's
Materials Needed:
*A square piece of floral foam
*1/8 of a yard of St Patrick's day fabric
*Florist wire (we picked green)
* 2 different kinds of paper.
Instructions:
First, cut your foam in half. Then take your fabric and wrap it up the sides {You are determining the length that you need}, then cut it to the desired length. Hot glue the fabric to the foam.
Cut your wire into varying lengths and save those ends to add some curly pop.
Now for your fun paper clovers. Go online and search for images of 4 leaf clovers. Copy that image into a word document and save it into 2 different sizes. Print clovers and use them as your templates for your explosion.
Trace the clovers onto your papers rotating the large and small colors. You will be using a paper for both the front and back so make sure to cut double what you want. Now, glue your papers together keeping the wire inside {like a sandwich}. Take a brown or black stamp pad to scuff the edges. place your clover skewers into the foam and your ends with a twist on the end for some flare. Drop some Elmer's glue into the top of each hole around the wire to give it a little more stability and keep the wires upright.
Now, if you want, you can add a little belt, or leprechaun hat band. We just used some black paper and a piece of foam to achieve the belt-buckle look.


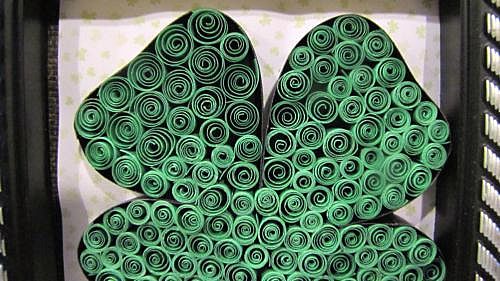
And lastlyt, I'm going to show you a project that involves Quilling.
{This was my first attempt at quilling!}

Ok. This project was easy and sometimes I wonder if I should add something to the bottom {to make it look better} or should I really stop with good?
To learn the art of quilling, I used Martha Stewart. She has a few posts on there with cute ideas, but mostly she gives you basic instructions.
Materials:
*A blank piece of paper {to draw the image on}
*Paper
*Something to cut with
*A large needle
Instructions:
First, draw the outline of your shape. I didn't use any special tools, I just free-handed it.
Cut about 2-3 8.5x11 papers into 1/2 inch strips {the long way} so they are 11 inches long.
Then I made a border out of black paper to stand up vertically and go all-the-way around my image. Glue down the black strip and hold it stable on the image {it'll take a couple of minutes}.
Then start rolling your curly Q's! Roll more than you think you will need, because I ran out way quick. I kept my roll pretty tight and put some Elmer's glue on the bottom of the spiral. Then I would loosen my hold, so it would expand to the size i wanted.
Glue the curls down starting from one side and working around {no jumping around inside the shape}. Fill her up and you are done.
If you are adventuresome, you could change the inside into fun exciting shapes like some fun ones found here.


Again, I am typing too late for my own good, so I hope this makes sense and inspires you to create some masterpieces of your own. :)

You can find this awesome post linked up to the following Fantastic Parties:


7 comments:
These are too cute1 Makes me want to start St. Patricks day decorating. I am a new follower:>
I love the quill clover - it is totally darling!! Thank you for linking up to my weekly party!!
Amanda
everycreativeendeavor.com
Such fun projects for St. Patrick's Day! Would you be willing to link this post up to my Springtime Holiday Link Party going on now? I'd love to have you! http://michellepaige.blogspot.com/2012/02/springtime-holiday-link-party.html
I love all your projects but especially the quilled clover! I'd love for you to share this at my link party that runs through Sat.
Rachel
http://adventuresofadiymom.blogspot.com/2012/02/terrific-tuesday-2-and-features.html
Teresa- Thanks so much for linking up your projects to my Springtime Holiday Link Party! I appreciate you taking the time to do that!
I love the quilled shamrock! So beautiful and intricate. Thanks so much for sharing with us!
These are seriously cute ideas! I am making a topiary and couldn't figure out what to do for the base so I love your hat band! My husband is from Ireland and Paddy's is a favorite holiday in our house. Would love it if you'd share these ideas on my linky party! Destination: Inspiration at Teagan's Travels.
http://teaganstravels.blogspot.com/2012/02/destination-inspiration-linky-party-3.html
Thanks, Michelle
Post a Comment