Thursday, May 31, 2012

DIY Thursday : Planter Boxes

With today being the last day in May, and summer quickly approaching, let's break out the power tools & build some beautiful Planter Boxes!

My husband & I made Five of these beauties to put in our parking stips.  I decided that I was tired of weeds, and I wanted to beautify the front of our house.


Here's what you'll need:
Materials List
·         (3) 2x4-8 Pressure Treated Boards
·         (14) 5/8” x  5.5”  x  6’ Gold Stained Fencing
·         (160) 1 ½ “ Screws
·         (10) 1 CU of Top Soil
Tools List
·         Compound Miter Saw
·         Screw Driver
Cut List
·         Cut the pressure treated boards into 1 Foot Pieces
·         Cut the Fencing Boards into 2 Foot Pieces
Directions
1.       Cut all your boards at once.  We’re starting an assembly line.  My fencing boards were dog-eared, but that didn’t matter, they still worked & were 50 cents cheaper than the other boards.
2.       To make a box, start with one 12” piece of 2x4.  Take 2 2’ fencing boards, laying side by side, and butt them against one end of the 2x4.  This will leave a slight overhang at the bottom, but it doesn’t really matter.
3.       Use two screws per board, and screw into the 2x4’s.
4.       Continue working around, until you have a completed box.
5.       Place box wherever you please, and fill with 2 bags of you top soil.
6.       Plant & enjoy!
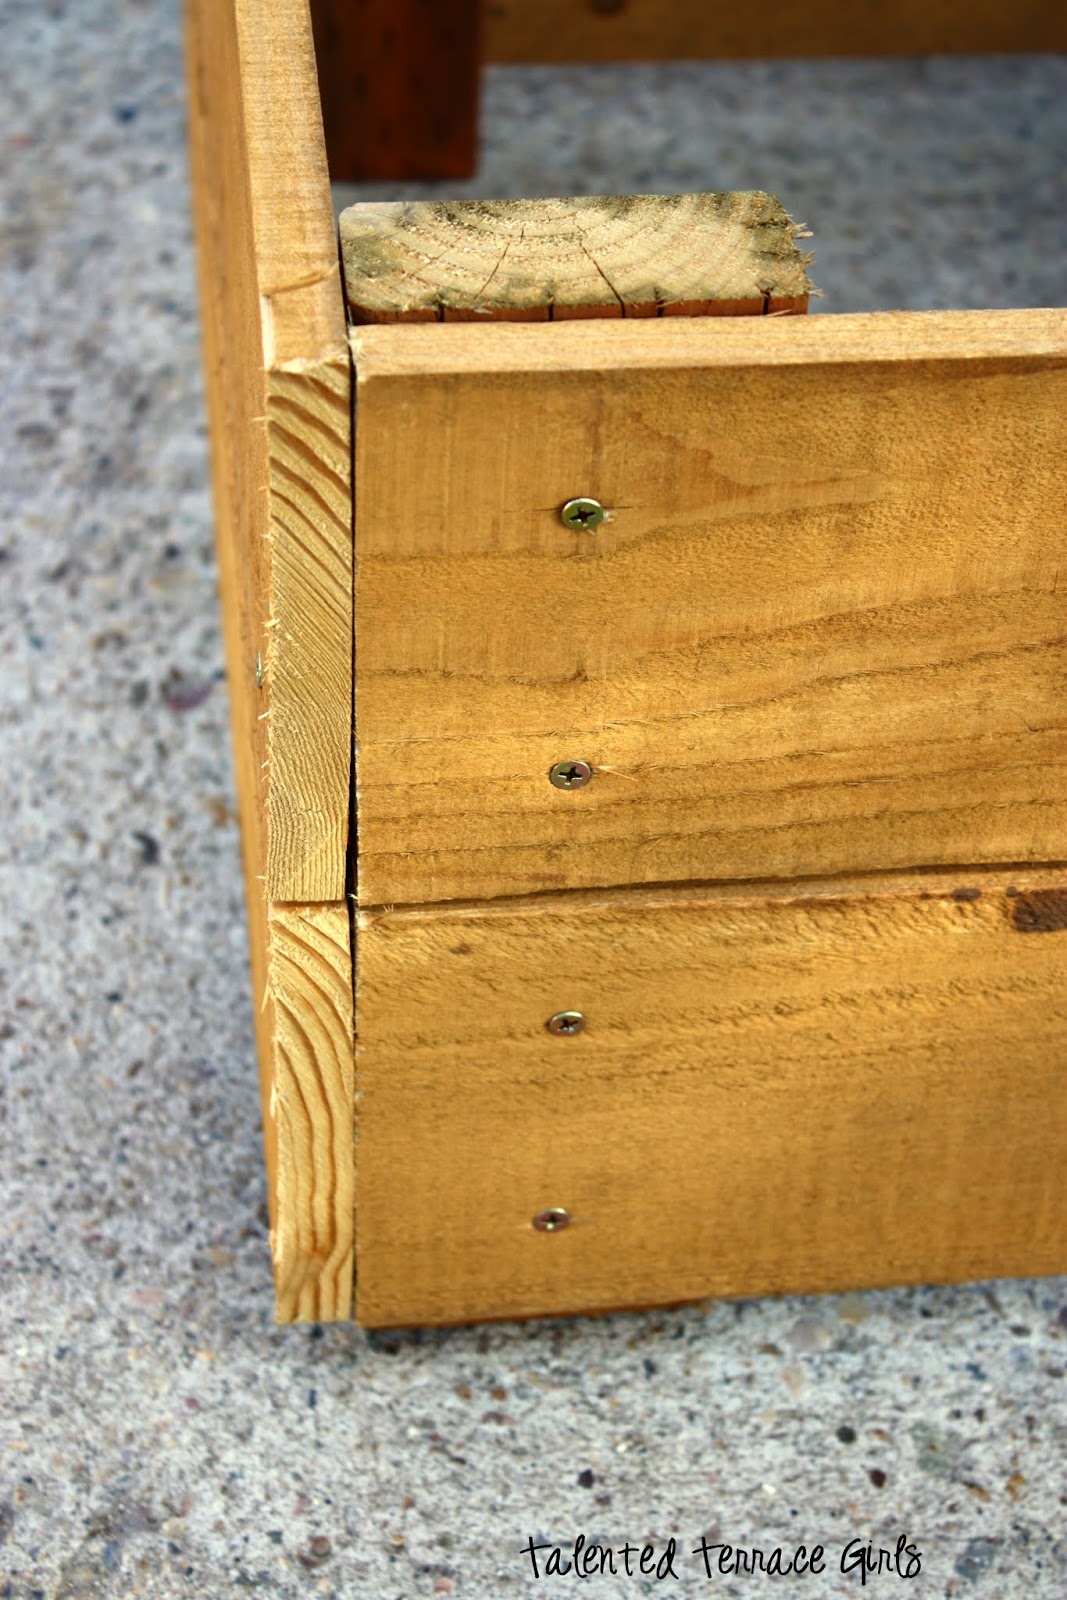
Here's a look at the corners in the box:


And here's a look at the outside corners of the box.  See how the top is flush together, and there's a little bit of space at the bottom??


Here's a top-view of my completed box:


And here's is one of the parking strips with the boxes...the other parking strip will have the other box.


~My materials to make 5 boxes cost me $60~

Thanks so much for stopping by!
You can find this awesome post linked up to the following Fantastic Parties:


Wednesday, May 30, 2012

Wild Card Wednesday: Puppy Themed Birthday Party


My little guy turned ONE this month and I usually throw a big party with the whole family to celebrate this big milestone. My little guy LOVES dogs! Like he will see a dog, any kind of dog, and starts laughing and smiling uncontrollably. It is the cutest thing ever!!! I thought it would be a lot of fun to do a puppy themed party for him since he is fascinated with dogs.

It is impossible to find puppy party themed supplies in stores. I could only find stuff online and I didn't really want to pay shipping and handling fees so I got creative and made my own stuff :)


Invitations: I made these with some stickers I got at Michaels and scrapbook paper. It says:
Join us for some Tail Waggin Fun
It's Grayson's 1st birthday
It'll be a dog gone good time!

 Welcome banner: I made this banner to welcome our guests

Doggie balloons: I should have probably gotten a close up picture of one of these, but I put several of these balloons up outside. I bought white balloons, drew a puppy face, and cut out black puppy ears and taped them onto the balloons.

Cupcakes: I made these yummy cucakes for all the kiddos. It a yellow cupcake with Teresa's chocolate buttercream frosting and sprinkles on top. I made the little cupcake toppers by taping a small square of scrapbook paper onto a toothpick and placing a sticker on the paper.

Puppy Cake: I made this 3D cake and I had so much fun doing it!!! It is a chocolate cake and has the same chocolate buttercream on it that the cupcake have. Everybody thought this cake was so cute! I will be posting a tutorial here in the next week or two on how you can make your own :)

The Serving Area:

Grayson getting ready to blow out his candle!!!!

Enjoying that cupcake :)


You can find this awesome post linked up to the following Fantastic Parties:


Tuesday, May 29, 2012

Sweet Tooth Tuesday: Oreo Chocolate Cake


This is a chocolate cake that nobody will ever forget.
I make cakes a lot and all different kids and flavors but this has been the FAVORITE so far.
everyone is giving orders for their birthday. This might be the new fav in your family.


1

pkg. (2-layer size) devil's food cake mix


4

squares BAKER'S Semi-SweetChocolate

1/4

cup butter

1

pkg. (8 oz.) PHILADELPHIA Cream Cheese, softened

1/2

cup sugar

2

cups thawed COOL WHIP Whipped Topping

12

OREO Cookies, coarsely crushed
HEAT oven to 350ºF.
PREPARE cake batter and bake in 2 (9-inch) round pans as directed on package. Cool cakes completely.
MICROWAVE chocolate and butter in small microwaveable bowl on 2 min. or until butter is melted. Stir until chocolate is completely melted. Cool 5 min. Meanwhile, beat cream cheese and sugar in large bowl with mixer until blended. Gently stir in COOL WHIP and crushed cookies.
place 1 cake layer on plate, spread with cream cheese mixture. Top with remaining cake layer. Spread top with chocolate glaze; let stand 10 min. or until firm. Keep refrigerated.


You can find this awesome post linked up to the following Fantastic Parties:


Monday, May 28, 2012

Munchkin Monday: Moon Dough


I have been seeing this stuff pop up everywhere so I decided to try making it on my own.  It is a mixture of playdoh and moon sand.  It is dough that can be left out and doesn't dry out.  Perfect for kids, right?  I hate pulling out the playdoh only to find a hard lump in there.  This stuff was super easy to make!  You can even have the chitlins help make it =)  I made it to keep my little guy and a couple kids I watch entertained.  It did the trick.  The only thing is is it can be a bit messy/.....it has the benefits of playdoh, but the messiness of sand....but it is still fun and if you make the kids play with it in a jelly-roll pan then most of the mess gets contained. =)

Ingredients:
8 cups four
1 cup baby oil (to make it smell sweet, use the lavender =)  )


Combine until it makes a nice crumbly texture and will hold together when pressed.  If you need to add more or less flour/oil, feel free.

(this wasn't a complete batch....I didn't have quite 1 cup oil so I used about 3/4 cup oil and 6 cups flour) 

 I haven't experimented with colors so I'm not sure about those, but if you add colors, leave a comment and let me know how it turned out for you.


p.s.  Don't let the kids pour water into it....it makes an ooey-gooey mess and ruins it......
You can find this awesome post linked up to the following Fantastic Parties: