Showing posts with label Thanksgiving. Show all posts

Wednesday, November 21, 2012

Wild Card Wednsday: Thanksgiving poppers

I made these last year for Thanksgiving. I wanted to do something fun to let everyone know how much they were loved and that we were all thankful for them in our family.
I had all my In-laws write something abotu each member of the family and send it to me. 
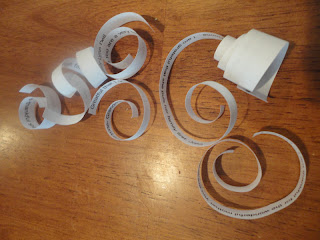
After receiving them all I typed them up and cut them apart. I rolled them around a pencil to make them cute a curly But you could fold them if you wanted.
Save all of your empty toilet paper rolls. Wrap the toilet paper roll in tissue paper and tie one end with ribbon, add you papers and some candy, then tie off the other end.

I made these circle fans with some lace and hot glues it on with a tag of the persons name.
Place them on everyone's plates at the dinner table and now you have the cutest table setting.

When you go to open then you will pull from both sides and you have a fun little Thankful pinata 

Happy Thanksgiving!

You can find this awesome post linked up to the following Fantastic Parties:


Thursday, November 1, 2012

DIY Thursday: Gobble Thanksgiving Craft

Here is another cute craft from one of our favorite stores Wood Creations. I did this craft this past week with my sister and I'm really excited how it turned out! I don't have very many decorations for Thanksgiving so I'm glad to have this to now display! I totally spaced taking pictures while I was creating so sorry, you all just get to see pictures of the finished product.

What you need:
  • Wood Gobble kit from Wood creations
  • paint
  • modge podge
  • ribbon
  • button
  • scrapbook paper
  • colored glitter
  • glue gun
  • sandpaper or nail file
The finished product :)

Close up of the turkey
I painted him brown and well as the edge of his "feathers". I modge podged on scrapbook paper and then used the end of a small paint brush and made dots using the paint I used on the whole project. I glued on a button and bow to make him extra cute


The G, b, and L you paint, let dry, apply a thin layer of modge podge, and then sprinkle with the same color of glitter as the paint. After that you apply another thin layer of modge podge over the glitter which will seal the paint and glitter making it so now glitter comes off
With the e and b I painted the outside of the letters, then traced and cut the letters on scrapbook paper, applied a thin layer of modge podge, and then applied my paper. I put another thin layer of modge podge over the top of the letters to protect the paper. After they were completely dried I tied three different types of ribbon together on them to add an extra cute look!


You can find this awesome post linked up to the following Fantastic Parties:

Friday, November 25, 2011

Foodie Friday : Turkey & Rice

We've got turkey.  Wonderful, moist turkey.  And I'm sure there are others that have some leftovers as well.  So, I'm going to give you guys one of my kids favorites recipes. 
The original recipe is Chicken & Rice, and is quite a regular guest over at my parent's house.  My family loves it, and it's been around for years.  This is a great meal in terms of using food storage.  Basically, all the ingredients are items that you probably already have sitting around.  This casserole is also easy to make, but it does take awhile to cook-but it is well worth it.

So here you go:

Turkey & Rice or Chicken & Rice

4 Cups of diced cooked Turkey or Chicken
1 Stick of butter
1 Cup of Rice
1 Packet of Lipton Onion Soup
3 Cups of Chicken Broth
1 Can of Cream of Chicken Soup
French's Fried Onions

In a 350 degree oven, stick the butter in a 9 x 13 pan & melt the butter

 When the butter is melted, pour the rice in

 And the turkey {or chicken}

 Sprinkle half of the Onion Soup packet over the turkey {or chicken} & rice

In a measuring cup, measure out 1 cup of broth.  Add the cream of chicken soup & the remaining soup mix.  Mix everything together.

 Pour the mixture over the turkey-rice.

 With the remaining 2 cups of broth, pour over everything.

 You don't have to mix anything together-just dump & go.  Place some foil on top.  Cook for an hour.  After the hour, take off the foil and let it cook for another 20 minutes.

 This is how it should look when you take it out of the oven:

 And then when you mix it up.  It should be moist, but not liquid-like.  If there's still alot of liquid, stick it back into the oven.

When you serve it up, sprinkle some fried onions on top {I forgot to buy some at the grocery store}. This will serve about 6 people.

Enjoy!


  Six Sister's Stuff  Photobucket

Thursday, November 24, 2011

Happy Thanksgiving!!!

We hope you all have a very happy Turkey Day!!  May you take a moment out of your busy lives and take an accounting of all your blessings.  I promise, you will lose count of them.  Remember to be grateful never take advantage all that we have been given.  Each day we have to spend with our families and friends is a blessing.

We hope you all get stuffed to the brim with delicious food, take a nice afternoon nap, and maybe enjoy a football game or two (or let your husband so that he won't get mad at you when you drain your bank account on Black Friday shopping the next day =)  ).

Wednesday, November 23, 2011

Wild Card Wednesday: What can be made from a book?

I had so much fun with this post. BOOKS ARE FUN! both to read and to craft with. Here are a few fun things you can make with books. There are still so much more but I didn't want the post to be crazy long.
The first is a book paper wreath
I made this for my mom's 50th birthday but how cute would it be to but a picture of a turkey or a Christmas tree in the middle.

{Click on the Image to see it bigger with the instructions}


This is a fun idea for Thanksgiving to use as a place card holder or for Christmas. Trow some glitter on them and hang them like snowflakes. I think I want to make more and hang them from my window as snowflakes. SO CUTE!!


This one is made from a full soft back book. I use it to make my vase taller. You could use it as a candle holder or it could stand on it's own.
remove the cover and...

I have had this book sitting on my book shelf for a few years now and i still love it just as much as when i made it. This book was made form a hard back book and you keep the cover on. If you want you could use a soft back and remove the cover just like the top.


This one I think is my new favorite
use a think book or rip the cover off a bigger book and cut it smaller. That is what I did.

I hope you enjoy books as much as I do....for reading and crafting