Showing posts with label Baby. Show all posts

Wednesday, February 5, 2014

Wild Card Wednesday: Memory Corsage

We blessed our new baby girl back in December and I wanted to share this cool little gift that my mom made for my little girl to wear on her special day. This is called a memory corsage and my mom originally saw this idea at a boutique she went to. She had bought one at the boutique she went to and had given it to one of my sisters who was having a baby girl. She wanted to keep the tradition going by giving each girl grand baby a corsage, and had a hard time finding one in the stores. You can find them online but some can be quite spendy. Their may be some stores that sell them, but I know my mom searched a lot of different stores and nobody had these.She finally decided to make one instead of buying one for my little girl. I think it turned out great and I am so grateful to have one that my mom made that will end up being passed down generation to generation! 

My daughter's corsage with the Memory Corsage poem


A close up


Here's the poem in case you want to make your own Corsage:


Memory Corsage

A flower for this tiny girl, tied softly at her wrist 
will carry forth a memory of the day that she was blessed.

Then lovingly preserve it, softly tuck this flower away,
to nestle in those curly locks on her baptism day.

So as the months turn to years, a guy may come her way, 
you'll want to share this flower with her on her wedding day.

Something old and something new that every bride must carry, 
Include this flower in her bouquet on the day that she will marry.

Before her flowers are tossed away, remove this flowered pearl, 
to adorn another's tiny wrist, of her very own little girl. 


Thursday, August 1, 2013

DIY Thursday: Moby Wrap

Do you see all those moms carrying their babies wrapped up, allowing their hands to be free?  I do!!  And when I had my baby girl in December, I decided I needed to be hands free since I have a very active 4 year old boy and I am on the PTA board at my daughter's school so I am always needing to go helps with stuff, and sometimes a stroller just doesn't work....plus I like to bake a lot and you need two hands for that.  Well, If you want a Moby wrap, those things are expensive!!  $40-$70 for a long piece of material?!  No thanks...I will do it myself for a fraction of the cost.  Your first step....locate a coupon to use for your material...if you have a Joann's nearby they always have at least a 40% off coupon either online, on the mobile app, or in their mailers.  

there are 2 ways to do this, the super duper easy way, or the super easy way.  
The super duper easy way: Find 6 yards of Jersey knit material, or a stretchy cotton (the jersey knit is usually plain colors and the stretch cotton will have designs).  Then, just cut it in half long ways (sometimes you can have the nice ladies at the cut counter do it) and viola!  You actually have 2 wraps....they make great presents.  6 yards can be pricey, that's why I say get a coupon, and if you have a friend go in half, you both get a wrap.


The super easy way:
Get 3 yards of material, cut in half long ways.


Pin the ends together and sew together.


Here is the finished product =)  I actually like having the seam there because when you wrap you have to locate the middle....easy when it is the seam =)  If you just do the 6 yard method, just sew a little mark or even use a marker and make a mark in the middle.


This was me and my pipsqueak baby wearing =)  This was at a  parade....you gotta love doing the self pictures because otherwise you won't be in any pictures..... It was nice having my hands free to chase candy for me the kids.  My little girl loves it too


And this is when we went to the Treehouse Museum.  It was good holding her in the wrap while I kept my hands free helping Brenna and Ian play and be creative =)

And it makes it easy when they take a nap, you just fold the material over to hold their head so it doesn't flop.


Here is a link to some tutorials on how to wrap.


Wednesday, March 20, 2013

Wild Card Wednesday: Baby Girl Shower

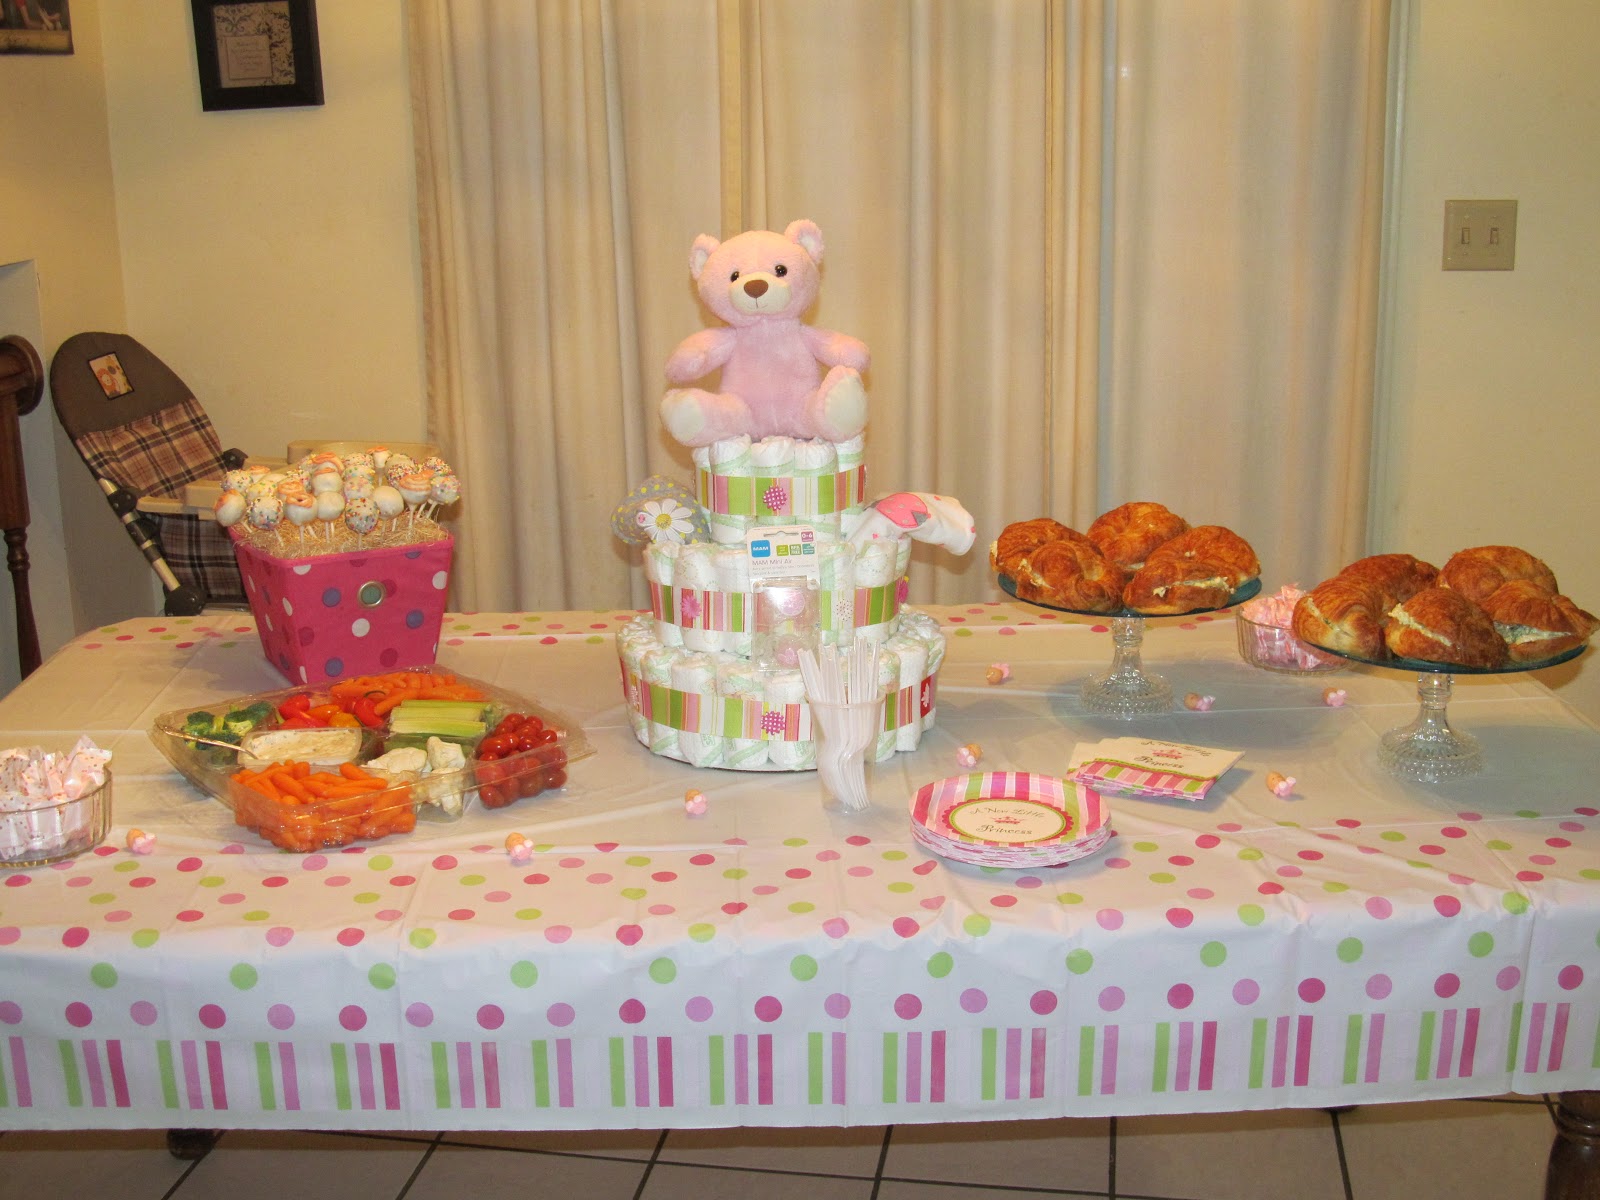
Just a little over a month ago my sister's and I threw a shower for my sister who was at the time about 2 weeks away from delivering her first little girl. This was a little bit smaller shower, but was lots of fun. We did an open house had a refreshment table for the guests. Here's some pictures of what we did.


Food:

Chicken Artichoke Salad Sandwiches, Cake pops, a veggie tray, butter mints, and a pink fruity drink

 For the recipe for the Chicken Artichoke Salad click here


Decorations:

Tissue paper pom poms, a diaper cake, and a tablecloth

 Click here for more information on how to make these.

Click here to learn how to make one of these


Tiffany

You can find this awesome post linked up to the following Fantastic Parties:


Thursday, March 7, 2013

DIY Thursday: Diaper Cake tutorial

Exactly one month ago I threw a shower for my sister who was having her 2nd baby, but first girl and I decided to make her a diaper cake as my gift to her. It also served as a centerpiece on the refreshment table. This was my first time making a diaper cake and I really enjoyed making it!  There are a couple different types of cakes you can make out there like a 2-tier, 3-tier, squared or round, and even some that are shaped to look like bicycles and other things! I decided to go with a 3-tier cake. This cake ended up costing me about $45 to make. These really are not that complicated to make and anybody can make one of these! All you need is a little creativity!

 Isn't it cute :)
Supplies:
  • box of size 1 diapers
  • cardboard cake round 14"
  • rubberbands
  • 1 large bottle of baby shampoo, powder, body wash
  • double stick tape
  • 2" wide ribbon and any other embelishments
  • cake topper (This can be a stuffed animal, card, or bow)
  • baby items to stick throughout the cake. I used a 2 pack of binkys and 3 bodysuits

For the bottom layer you will do three rounds. Start by rolling up your diapers and placing a rubber band around them. I used 34 diapers total on the bottom. Start by placing some double sided tape on the bottom of your bottle of baby wash or whatever other bottle you choose and place it in the center of the cake round. Wrap your diapers around the bottle until you reach the edge of your cake round. I went around the bottle 3 times and put a big rubber band around the whole thing to secure it a little better. It should like this:


For the second tier I used 20 diapers and did two rows of diapers and placed a big rubber band over the whole thing to secure. It should look like this:

face view

 top view

The third tier is made out of eight diapers. Make sure to secure with a rubber band over the whole tier.


 Now comes the fun part-decorating! Start by placing ribbon along each tier to cover up those ugly rubber bands. I used a little dab of hot glue to piece the ribbon together.


Next I added on a few little pink flowers with some super glue that I had already in my scrapbook stuff


The final step is to add on your topper and any stuff your got to put your cake! You now have an adorable diaper cake that the mom-to-be is sure to love.


Tiffany

You can find this awesome post linked up to the following Fantastic Parties:


Thursday, January 17, 2013

DIY Thursday: Carseat Canopy


I see those cute car seat canopies everywhere!  They weren't around when I had my first 2 kids.  All we did was throw a blanket over the car seat.  But every time I have seen one I have wished I could have had one.  Then I look at how much some places are charging....the least expensive has been $30 and up to as much as $60.  Are you kidding?!  There is no way I will spend that much....I'll just keep throwing a blanket over the top.  But then because of the wonderful world of Pinterest, I found a couple tutorials on how to make them.  Once I read them over I realized that there really isn't much difference between making these and making a double sided receiving blanket.  So I decided I was going to make one for next little girl (this will probably post after I have had her).    So here is what I did, and I will include the links to the tutorials that I used as well because I'm sure my instructions won't be very clear.

I got 1 1/2 yards of 2 coordinating fabrics.  I got a little extra just to be safe....plus I used a coupon so it didn't cost much more for it =)

Put your right sides together and make sure your fabrics are the same widths, if not trim them so they are,

Then measure 1 yard (36 inches) and I actually did about 37 in to allow for seams (but hindsight, I wish I would have done it about 40 in just to have a bit more length in the front).  


Then trim your fabric, but don't throw out the scraps.  You will use those for the straps to hook to the car seat handle.

Then pin your edges together and sew about 1/4 in seam around it. (make sure the right sides are together) and leave part of one side unsewn so you can flip it right sides out.  Once you have it sewn and flipped, then find the part you didn't sew, and pin it together.  I fold the edges down so it matches how the rest of the fabric looks.  Then do a bit of a decorative stitch (I just used zigzag) all around it.  This adds a bit of decorations and also will close up that hole.  I wanted to do a pink stitch around but I can't remember where I put my pink thread....so I just did black.  I also ironed mine before I sewed it, just so the edges were flat together.  Now you are done with the big piece.  Easy, huh?


The next part is a bit more tricky.

Take your scraps and measure them 3 inches by 7inches (once again, I did about 7 1/2 to allow for seams)  Cut 2 of each pattern.


Then You put the right sides together and ew around the edges, except for one side.  You will need to flip it right side out.

Once you have the three sides sewn, and then flipped out, do the same thing as with the big piece and do a stitch around the outside to give a bit of decoration and also to close off the end.  Do this with both sets of strips.


Now is the velcro.  Decide which side you want to have facing  place the velcro on opposite sides (I had one on the polka dots, and one on the opposite end flower side so when you put them together it makes a loop)

Then sew your velco in place.  

Then, fold your big piece of fabric in half, and measure down 18 inches (this blog did an excellent job of explaining this part)  Then on either side of that, measure out 3 inches, and then make a line 2 inches long.  This is where you will be sewing your strips on.


Measure down 2 1/2 inches on your strip and place that on teh line line you just made, and pin in place.  Then on the opposite end measure up 2 1/2 inches and pin.  You will sew it to the big piece of fabric on these lines.  Make sure you do the Fabric facing down that you want to be seen when it is velcroed together.


Then viola! You have your canopy.  Just attach to the car seat.  If you are like me and don't sew lines that straight....that's ok....this project is very forgiving!  I know a lot of my lines were straight and you can't tell....the only ones that would be really visible are the ones on top and they can easily be covered.   
I sewed cute little pink flower buttons on the top of my strips to add some decoration (and to cover up my really crooked seams from sewing the velcro in place.  You can use snap buttons instead of velcro if you want.  And some people just skipped the strips and sewed on some wide ribbon and then just tied the carseat in place.

It's up to you!  Here is the other tutorial I used ( I didn't sew the lines in the thirds like she suggested but you can =)  ).  I went back and forth between them.   It's always nice to have several sources because one part was clearer to me on one, and then on the other it helped more.   


I love well it matches the new car seat I bought.  I bought this fabric months ago, pretty much as soon as I found out we were having a girl and then I found the stroller and car seat combo on sale a few months later and it was fate that they matched so well.  My old set is from when my almost 8 year old was born so the car seat was expired and the stroller was trashed.  I splurged and got me a new one since all of the other baby items I had I was reusing from either or both the other kids.


You can find this awesome post linked up to the following Fantastic Parties: