Showing posts with label Cookies. Show all posts

Tuesday, January 21, 2014

Reese's Peanut Butter Cup Stuffed Peanut Butter Cookies.


My hubby is obsessed with chocolate and peanut butter.  I am always trying to find new cookie recipes with this combinations....but there is only so much you can do with chocolate and peanut butter.  The I found this recipe.  And I love to do cookies with things stuffed inside so this was perfect. I got the recipe from Sally's Baking Addiction.  Go visit her site.  She has some amazing pictures.  She also did a drizzle on her cookies that I omitted on mine.  I did copy and paste her instructions because they were excellent. =)
Ingredients
Cookies
  • 1 and ¼ cup all-purpose flour
  • ½ teaspoon baking soda
  • ¼ teaspoon salt
  • ½ cup unsalted butter, softened to room temperature
  • ½ cupbrown sugar 
  • ¼ cup  granulated sugar
  • 1 large egg, at room temperature
  • ¾ cup creamy peanut butter*
  • 1 teaspoon vanilla extract
  • 18 Reese’s Miniature Peanut Butter Cups, unwrapped
In a large bowl using a hand-held mixer or stand mixer with paddle attachment, cream the butter, brown sugar, and white sugar together on medium speed until combined. On low speed, beat in the peanut butter, egg, and vanilla. Turn the mixer to high and beat until light in color and smooth. Turn the mixer to low and slowly pour in the dry ingredients. Mix until combined and a dough is formed.
Cover tightly and chill the cookie dough for at least 1 hour (or up to 3 days). Chilling is mandatory.
Remove cookie dough from the refrigerator. Preheat oven to 350F degrees. Take 1 Tablespoon of dough and roll into a ball. Take another 1 Tablespoon of dough and roll into a ball. Stick a peanut butter cup into one ball, kind of like a "cradle" as shown above. Top the peanut butter cup with other cookie dough ball and seal down the sides so that the peanut butter cup is securely stuffed inside. Roll the large cookie dough ball in your hands to ensure it's smooth. Repeat with the rest of the dough and 18 peanut butter cups.
Bake the cookies for 10-11 minutes or until very lightly browned on the sides. Some cookies may be taller than others, depending how the peanut butter cup was positioned inside. Just press the cookies down a bit to flatten them out. Allow to cool on the cookie sheet for at least 10 minutes and transfer to a wire rack to cool completely.
Cookies stay fresh stored covered at room temperature for up to 7 days. Cookies freeze well, up to 3 months. Stuffed cookie dough balls freeze well, up to 2 months. Bake for 2 extra minutes, do not thaw.
*Room temperature egg is required for the cookies. General rule of thumb I use for my own cookie recipes: when using warm or room temperature butter, I always use room temperature egg as well. To bring egg to room temperature quickly, simply place in a cup of warm water for 5 minutes. 
*Thick, store-bought peanut butter is preferred. If using natural style, make sure the peanut butter is thick and not oily in the slightest - which will make your cookie dough thin, slippery, and spread all over the baking sheet even after chilling the cookie dough. You need thick, non-oily peanut butter like Jif or Skippy.

Tuesday, December 3, 2013

Sweet Tooth Tuesday: Nutella Oreo Cheesecake Deep Dish Cookie Pie

That name is a mouthful!!  But so is this dish!  It is very good and really rich!  The way I found this was I was going to a Pie Night (everyone brings a pie to share) and I didn't have a pie and it was in 2 hours...not enough time to make a pie.  So I searched pinterest and found this recipe.  It was a huge hit with everyone!!!  Here is the place I found it: Back For Seconds

Ingredients

  • 3/4 cups butter (softened)
  • 8oz cream cheese (softened)
  • 1 3/4 cup sugar
  • 1 egg
  • 2 teaspoons vanilla
  • 1 teaspoon baking soda
  • 1/2 teaspoon salt
  • 2 cups flour
  • 1 cup chocolate chips
  • 1 1/2 cup Oreos (chopped )
  • 3/4 cups Nutella

Directions

Preheat oven to 350*
In a large bowl cream the butter, cream cheese and sugar until smooth. Mix in the egg and vanilla.
Gradually add in the soda, salt, and flour and mix until incorporated being careful not to over mix.
Stir in 1 cup of oreos and the chocolate chips by hand.  Press half of the dough into a greased cast
 iron skillet.  Spread 1/2 cup nutella all around the dough and top with remaining dough.
Bake for 30-35 minute or until toothpick inserted comes out clean (there will be some melted chocolate
 on the toothpick, you just want to be sure the dough itself is cooked through)
Let cool and drizzle with remaining 1/4 cup of nutella (melted) and remaining oreos

Tuesday, November 26, 2013

Sweet Tooth Tuesday: S'more Cookies

Yes, I know I have done s'more cookies before, but this is a different version.  And my husband's new favorite.  I recently made these and took them to the job I am working during the holidays...trying to bribe my way into making everyone like me.  It worked =)  Well...until they ate more and more and ruined their diets and now they don't like me for that =) These are super good and you should go make them right now!!


1/2 cup (1 stick) butter, softened
1/3 cup sugar
1/2 cup brown sugar
1 egg
1 teaspoon vanilla
1 1/4 cups flour
1 cup graham cracker crumbs
1/2 teaspoon baking soda
1/2 teaspoon salt
1 cup Hershey Bar chunks (I crunched up a king sized bar) you can use chocolate chips instead
1/2 cup Jet Puffed Mallow Bits (the min marshmallows you find in hot chocolate packets), they are found in the hot chocolate isle at Walmart and Target


Preheat oven to 350 degrees F. Line a cookie sheet with parchment paper and spray with cooking spray. Using a mixer, cream the butter and sugars until light and fluffy, about 3 minutes. Add the egg and vanilla and beat for an additional 2 minutes.
 In a separate bowl, whisk together the graham cracker crumbs, flour, baking soda, and salt. Slowly add the dry ingredients to the wet ingredients, and mix on low speed until the dough just comes together. Add the chocolate and marshmallows and stir to combine.
Place tablespoon sized scoops of dough onto the prepared cookie sheet. Bake at 350 for 6-8 minutes.
Makes 2 dozen cookies.

Tuesday, November 5, 2013

Sweet Tooth Tuesday: Hot Cocoa Cookies

Do you like those mini marshmallows that are in hot chocolate?  I love them but it seems like there are never enough in the package.  Well...I found these fun things so I don't have that problem again!!  

They sell the mini marshmallows separate now!! 
 I found them at Walmart and Target.  Plus, there is a great recipe on the back for some yummy cookies!!  so of course I had to make them.  I think they were a hit and will be repeat visitors to my oven =)


1 1/4 c. butter, softened
1 c. sugar
2/13 c. brown sugar
2 eggs
1 tsp. vanilla
3 1/4 c. flour
4 pkgs. instant hot cocoa mix (don't use sugar free)
1 1/4 tsp. baking soda
1 tsp. baking powder
1 c. chocolate chips
1 c. Jet-puffed Vanilla Mallow bits

Heat oven to 350 degrees.  Beat butter and sugars together.  Add eggs and vanilla.  combine flour, cocoa mix, baking soda and baking powder in a separate bowl.  Gradually mix into butter mix.  Stir in chocolate chips and marshmallow bits.  
Drop 2 tbsp. dough, about 2 inches apart.  Bake about 9-11 minutes (I did mine 8-9 but I like my cookies soft)  Cool on a baking sheet and enjoy.


Friday, October 4, 2013

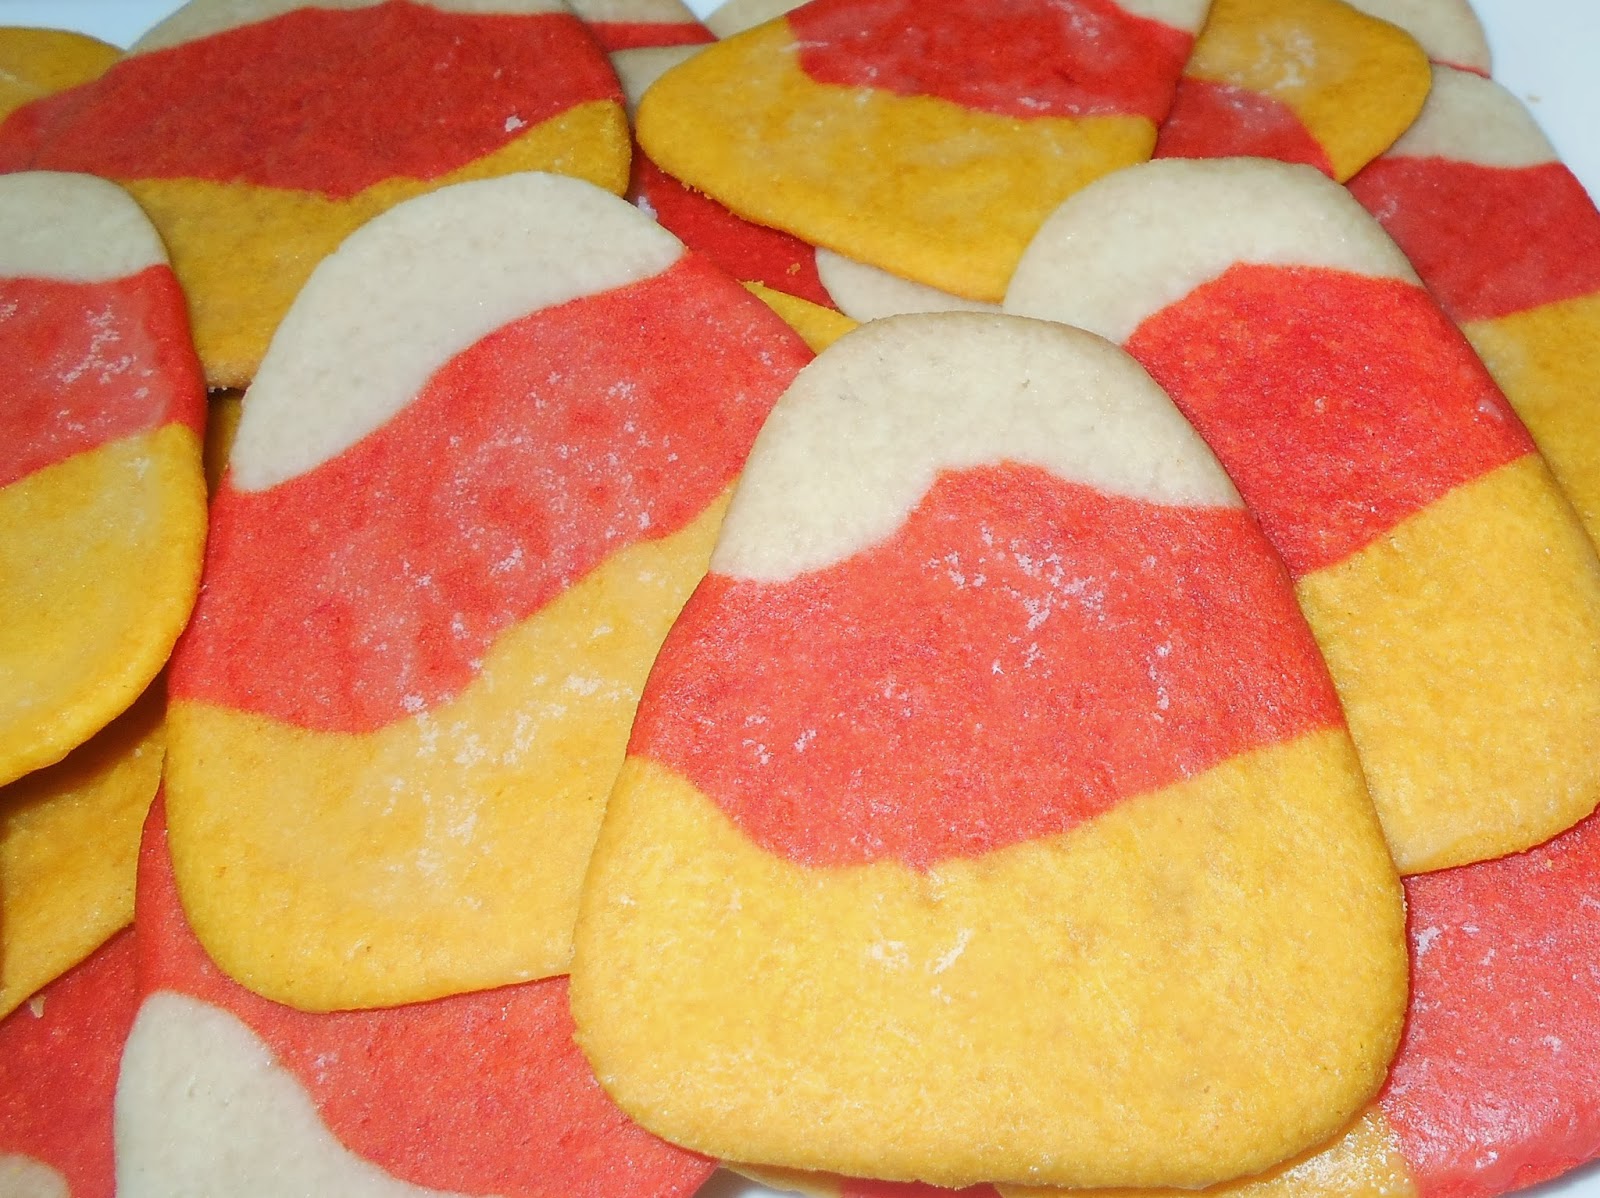
Candy Corn Cookies - Two Ways

Candy Corn Cookies!! Aren't they so festive? We tried this recipe last year and loved it so much we made it twice and remembered it enough to do it again this year. It is just a simple sugar cookie but it is really tasty, I got it from the TasteofHome website.
Ingredients:
  • 1-1/2 cups butter, softened
  • 1-1/2 cups sugar
  • 1/2 teaspoon vanilla extract
  • 3 cups all-purpose flour
  • 1 teaspoon baking soda
  • 1/2 teaspoon salt
  • Yellow and orange paste food coloring (I used liquid and it worked fine just took a bit more i suppose)
Directions:In a large bowl, cream butter and sugar until light and fluffy. Beat in vanilla. Combine flour, baking soda and salt; gradually add to creamed mixture and mix well.
Now there are two ways to form the shape of these yummy cookies and I have tried both. For the first way which is a bit simpler, split the dough into thirds and color one orange and one yellow leaving the last third white.
I stole the idea of how to shape the cookies from Kathie at her blog Kathie Cooks. Thanks Kathie, such a great idea. You take a bread loaf pan and line it with parchment paper or plastic wrap. (Just a tip, I used plastic wrap and it still had a hard time coming out. Try multiple layers.) Then just layer the dough in starting with orange then yellow then white. Try to make your layers as flat as possible.
Then put your pan in the fridge for two hour up to overnight. I did two hours and it worked great. Take your dough out of the fridge next and out of the pan, and slice it the short way in to 1/4 in slices. While you are slicing preheat your oven to 350.
Next cut your slices into triangle shapes. Squish in the corners so they look more rounded and place on your cookie sheet. (Another tip, I always cook my cookies on parchment paper so the bottoms don't brown as easily)
The second way may take a bit more time but I think it is worth it. You get bigger cookies and they all look like candy corn.
 Form your dough into a log and cut it into 6 equal parts.
 One section will stay white, the rest of them you can start by coloring it all yellow. (I just stuck mine back into the mixer and added the color in that way.)
 Take your yellow dough make a log again separate it into 5 sections. Leave three yellow and pop the other two back into the mixer and add your red to make orange.
 Then you layer them all together in gradually thinner layers.
 And form it into a Candy Corn shape.
 Wrap in plastic wrap and stick it in your fridge. It helps keep the shape if you pop your head in the fridge every once in awhile and turn the cookies, so all the sides stay flat.
 After a couple hours in the fridge all you do is cut them up and pop(I am saying pop a lot today...)them onto a baking sheet.
Bake for 7 to 10 min in either shape and voila! They should not be brown at all.
Ta DA!!! They are delicious and perfect. But... if you want to take them one step further like I did, you can glaze them!!! Yummo. It was just a simple glaze, I got the recipe from my handy dandy Joy of Cooking the 75th anniversary addition. (If you were wondering)
  • 1 cup powdered sugar
  • 2-3 tbs water
  • 1/4 tsp vanilla
That's all folks, mix it together and apply to your corn. I used a pastry brush, actually it might be a basting brush but whatever. I also doubled the glaze recipe because the above only makes 1/2 cup of glaze.  Then you place your cookies on cooling racks and brushed them and let them sit for 20-30 min so the glaze hardens up.
Oh they are so cute and so delicious. I want to try a lemon glaze on top next time. And do not let your lame significant other tease you about the fact that some of the colors are upside down on the cookies. (If you shape them the first way.) And if he or she does, no cookies for them!
Sorry about the two different qualities of pictures, the first were taken last year. Thank goodness I have a new camera, not perfect but better!!

Tuesday, September 3, 2013

Sweet Tooth Tuesday: Pumpkin Snickerdoodles


I have begun looking forward the cooler fall weather that will be on its way here shortly and decided what better way to get excited for fall then by making some pumpkin cookies. I love fall and especially the yummy recipes that use pumpkin. I just made these lovely cookies and oh man are they good! I found the recipe for these cookies on this website, but I tweaked it a little bit. I had read some of the comments and it sounded like the actual cookie was a little bland tasting so I doubled the spices cause I wanted to taste them! I also used pumpkin pie spice in the cinnamon/sugar mixture that coats the cookies instead of  ginger. I really liked how they turned out!

Pumpkin Snickerdoodles:

  • 3 3/4 cups flour
  • 1 1/2 tsp baking powder
  • 1/2 tsp salt
  • 1 tsp cinnamon
  • 1/2 tsp nutmeg
  • 2 sticks unsalted butter, room temp
  • 1 cup sugar
  • 1/2 cup brown sugar
  • 1 egg
  • 2 tsp vanilla extract
Coating
  • 1/2 cup sugar
  • 1 tsp cinnamon
  • 1/2 tsp pumpkin pie spice
  • dash of allspice

In medium bowl combine, combine flour, baking powder, salt, cinnamon, and nutmeg. Set aside. In a large bowl beat butter and sugars together on medium speed unitl well blended. Next beat in pumpkin. Then add the egg and vanilla. Then slowly add in the dry ingredients. Mix only until all combined. Cover and refridgerate dough and one hour until firm.

Preheat oven to 350 degrees

Line cookie sheets with parchment paper. In a small bowl, combine your coating ingredients. Scoop up about 2 1/2 Tablespoons worth of batter, roll into a little ball, and roll in sugar/cinnamon mixture and place on cookie sheet about two inches apart. Flatten the tops of the cookies with the palm of your hand or with the bottom of  a glass.

Bake cookies for 10-12 minutes. Let cool on tray about 5 minutes before transferring over to a cooling rack to let cool completely.


Tuesday, August 27, 2013

Sweet Tooth Tuesday: Tie Dye Sugar Cookies

These turned out so cute!! Maybe a bit too cute because now my Mom and sister want me to make about 150 for my sister's upcoming wedding. Yikes! This was another project for my sister's tie dye bridal shower and it was a bit of an adventure. I have never used royal icing before so I did some research on Pinterest to get me started.
I got the original idea from The Hungry Housewife.
I found some really great tips about flooding and piping royal icing from The Sweet Adventures of Sugarbelle.
And found a recipe for royal icing (using egg whites not meringue powder) at Sweetopia. (The link for the recipe is near the bottom of the post.)
There are a ton of amazing cookie artists out there Sugerbelle and Sweetopia were both amazing sites if you want to get into this beautiful hobby.
 I started out with my families sugar cookie recipe (which is amazing!) and I promise I will share that with you all soon. Then I made the Royal Icing.
Royal Icing
1 lb powdered sugar
4 large egg whites
1 Tbs Cream of Tartar

Mix the egg whites and cream of tartar for 30 sec. to get rid of the lumps.
Pour in all the powdered sugar and mix with the paddle attachment at medium speed for 10 min.

**Just as a side note my instructions will vary slightly from the recipe found at Sweetopia. After following her recipe I found the icing to runny and had to mix it for longer at a higher speed to get the thick consistency I wanted.

I tinted about half of my icing yellow (sisters favorite color) and used a piping bag with a small tip to outline the cookies. This creates a barrier for when you go back to fill in the middle.


Then I separated the remaining icing into three bowls and colored and thinned out the consistency. You want the icing to be able to fill in the cookie and create a smooth finish. Sugarbelle describes the outline icing as the consistency of toothpaste and the flood icing to fill it in as shampoo. I just added water a teaspoon at a time till I got it right. I am sorry I can't give you better tips than that but if you need more specific instruction go to the link above to Sugarbelle. She has amazing tips and video demonstrations.

I started out trying to pipe the icing to fill in the cookie but found it much easier to spoon a little on and smooth it out and fill it in with the back of the spoon. It gave me more control.

 I put the rest of the icing in piping bags.
 And made different swirls on top of the yellow icing. I think that next time I would use squeeze bottles for more control and easier storage.
You can see that the blue and green icing is sitting on top of the yellow and we want it to all meld together. To get it all to flatten out all you have to do is give your cookie a good shake.
 TA DA! Nice and smooth.
I forgot to take a picture of the next step but all you do it take a toothpick and drag it from either the middle to the edges or edged to middle. Just experiment with it and have fun. The toothpick will leave little indented lines on your cookie, just give them another shake to smooth them out.

 Leave them to dry until hard, I left them out overnight, and then enjoy. They stack like a dream and store really well.

I hope these inspire you to get creative in the kitchen. A little extra effort can go along way. Wish me luck on the 150 I still have to make. Happy Baking!


Tuesday, July 23, 2013

Sweet Tooth Tuesday : Gorilla poop (Nutella No-Bake cookies)


So awhile ago I bought a huge thing of Nutella at Sam's. Club. I have been trying to come up with way to use it so I don't open the jar and eat it by the spoonful as I am watching TV....not that that isn't a bad thing....but for some reason my pants don't like it....

On Father's Day, since I didn't have a chance to go to the store the day before to get the ingredients for the dessert I wanted ( yes....I was a procrastinator and waited until the day before) because I had 3 kids screaming and fighting....so my store trip was cut short. But my hubby is such a great dad and hubby that I still wanted to make something sweet for my sweetie (I told him the elaborate dessert would be Monday after I go to the store) He has been asking me to make some no bake cookies for awhile and he likes Nutella.... so this was the perfect time to try a new recipe.  I think I may like this version better than the classic peanut butter and chocolate....I got my original recipe from Six Sister's Stuff (I LOVE that blog...go check them out!!! They have a recipe for everything!)


Ingredients:
1/2 cup butter
1/2 cup milk
1 3/4 cup granulated sugar
4 Tablespoons cocoa powder
2 teaspoons vanilla extract
1/2 cup Nutella
3 cups quick cooking oats
Directions:
In a saucepan, combine butter, milk, sugar, and cocoa powder and heat over medium heat. Bring to a rolling boil and let boil for one minute. Remove your saucepan from the heat.
Add Nutella and vanilla to hot mixture and stir until combined. Add oats and stir until completely incorporated.
Drop by spoonfuls onto baking sheets lined with wax paper. Let cool (or you can eat them all warm and gooey- that’s yummy too!).
*Sometimes, this recipe turns out more runny or more dry . . . I really think that it depends on weather, altitude, and how long it boils.  I think I ended up adding about 4 cups of oats....so make sure you have extra on hand, I almost ran out....

Tuesday, July 16, 2013

Sweet Tooth Tuesday: Boysenberry Almond Shortbread Cookies


My daughter and I were craving something sweet a little while back and while skimming through my collection of recipes I found this one which I had never made before, but looked good. The original recipe calls for raspberry jam, but I just had strawberry and boysenberry so I decided to try out the boysenberry and they were still really yummy! These are sure to satisfy that sweet tooth!


Cookies:
  • 1 cup butter, softened
  • 2/3 cup sugar
  • 1/2 tsp almond extract
  • 2 cups flour
  • seedless raspberry jam (or another flavor if you prefer)
Glaze:
  • 1/2 cup powdered sugar
  • 3/4 tsp almond extract
  • 3 tsp milk
Mix together the butter, sugar, and almond extract. Mix in flour. Roll into 1 1/2 inch balls and place on an ungreased cookie sheet. Press thumb in center of ball to make a small hole. Fill the hole with jam. Bake at 350 degrees for 18-22 minutes, until edges are slightly brown. Let cool a couple of minutes and transfer to a cooling rack. Combine glaze ingredients until smooth. Dizzle warm cookies with glaze. Make about 18 cookies.
* If you put some towels under the cooling rack it will make cleanup a lot easier!

\

Yummy!!!

:


Tuesday, July 9, 2013

SweetTooth Tuesdays: Strawberries and Cream Cookies

I LOVE COOKIES!!!!  So I am always trying to find new recipes to try.  After awhile chocolate chip/peanut butter/oatmeal cookies get kinda boring...tasty, but boring.  So I wanted to find a different kind of cookie.  I stumbled across this cookie....and I feel bad because I can't remember the address....I was looking at stuff on pinterest, then clicked a link on a blog, clicked another link to a different blog, and so on and can't remember where I ended up.  But luckily I wrote down the recipe =)  (so if anyone knows the original recipe, please let me know so I can give them credit for this amazing cookie!!)

Now that spring/summer are on their way....at least according to the calendar we're supposed to be in spring but the weather has a mind of it's own....I get in the mood for fruity things.  I found this recipe and couldn't resist...especially when it came to licking the beaters....=)


These have a hint of strawberry and you get that creamy taste too...hence the name strawberries and cream =)

Recipe:

1 c. butter, softened
2 tbsp. strawberry jello (the powder, do not make the jello and then add it....)
2 eggs
1 c. sugar
1 tsp. vanilla
1 small pkg. white chocolate pudding (once again, the powder, do not make it and then add)
2 1/2 c. flour
1 tsp. baking soda
1/2 tsp. salt
white chocolate chips (however many you want =)  )

Preheat oven to 350 degrees.  Cream butter and sugar together.  Add the strawberry jello.  Mix in vanilla and eggs.  Then add in all the dry ingredients and chips.  

Using a cookie scoop place on a cookie sheet. bake for 9-11 minutes.


 Let them cool on a cooling rack (try to resist eating right out of the oven....melted chocolate chips burn the tongue....)

  Once they are cooled, enjoy!!!


Tuesday, June 25, 2013

Sweet Tooth Tuesday: Smore stuffed cookies

I love to stuff things inside of cookies =)  This recipe is one of my favorites....but just a warning, the cookies it makes are pretty big (the original version).  I cut the size in half so they are a bit more manageable.  The original recipe calls for half a Graham cracker, half a large marshmallow and a couple squares of Hershey bar.....when they are cooked they are about the size of  a small plate.  I found the original over at Picky Palate.  These are the perfect summer cookie since s'mores are the classic camping snack.


These aren't too fancy, but just a bit tricky to wrap the dough around. Just use your favorite chocolate chip cookie dough recipe, mini marshmallows, chocolate chips.  You can use big marshmallows, just cut them or you can use Hershey bars, but just use 1 square....unless you want to make them giant like she did at Picky Palate =) 

Layer your stuff
Smoosh the dough around so the cookie,marshmallow, and chocolate chips are completely covered.


Cook for about 15 minutes at 350 degrees.

Sorry, not a good picture of the inside because I took it after the cookie had cooled, but go check out Picky Palate's pictures....They are mouthwatering with their strands of marshmallow and chocolate oozing out....