Monday, April 22, 2013

Munchkin Monday: Boy T-Shirt

I see all those cute crafts and clothes you can do for little girls, but there aren't many for little boys.  My little guy loves it when I make him something and whenever I make something for his sisters he always gets this ad look on his face.  So I decided he needed something cool just for him.  So I got out my cricut and cut out and found a good boy pattern.
I cut it out on freezer paper, and then ironed the freezer paper onto the shirt.  Freezer paper makes excellent stencils for fabric.  you place the shiny side on the fabric and then iron.  It seals it to the cloth but you can easily pull it up and it doesn't leave a residue.

Then I painted.


Peeled off the paper and viola!

He loved it!! 
Before you wash it, once the paint dries, throw it in the dryer for a bit so that it will seal the paint to the shirt better or else it may fade a bit. ( I learned that the hard way...)

Now go and find a cute pattern and make some fun shirts!!  and you really don't need a fancy cutting machine, just cut anything you want into freezer paper.  And if you want to get adventurous...let the kids design and paint their own =)

*Trinity*


You can find this awesome post linked up to the following Fantastic Parties:


Thursday, April 18, 2013

DIY Thursday: Beaded Decoration


Beaded Decoration
   Hey everyone this is Tiffany:) I had seen a similar looking craft on Joann’s craft store’s website and I kind of used it as my inspiration for this craft. It’s a little different and some of you may not like it, but I think it is kind of cool. This can also be found on Crazy & Cool with a side of Crafty.
                                                               
                                                                           
What you will need:
·         Brown beads ( I bought 2 different kinds)
·         Popcorn shell beads
·         Red beads (I bought 2 different kinds)
·         20-gauge brown wire
·         20-gauge gunmetal wire
·         A round rock with a flat base
·         Wire cutters


1.       Cut multiple brown and gunmetal wires about 20-25 pieces that are 35 inches long.
2.       Take a few pieces of wire and lay them out on your worktable. Place the rock directly in the middle on top of the wires and pull the wires up the rock so they meet in the middle. Keep these wires as tight and close as you can to the rock. Continue to add wires in the same manner, placing them in different directions.
3.       I ended up saving the wire pieces that were not as long and then I used those and wrapped them around all the wires as tight as I possibly could.
4.       Begin to place beads on your wires and fold down your wires at the end so the beads don’t fall off.
5.       Instead of putting beads on every single wire I saved a few  and curled them by wrapping them around a marker.

Tiffany
You can find this awesome post linked up to the following Fantastic Parties:


Wednesday, April 17, 2013

Wild Card Wednesday: Last Name Vinyl Sign

The family I nanny for is getting married in a week and a half.  I decided for a wedding present I would get them a crockpot.  I kept telling her how easy crockpot meals are.  They are busy family like most of us and the last thing they want to do when they get home is make dinner.  Along side with the crockpot I wanted to make them something too.  I decided to use my Silhouette Cameo and put their last name and the date they are getting married on a wood board.  As I got thinking I thought it was a little plain and wanted to add a little something else to it.  The mom and dad love to ski.  I'm sure next ski season they will be getting their little boy out on the slopes.  One works for Solomon and the other writes for a ski magazine.  One night a brillant idea came to mind.  (I love when that happens.)  I thought to look on Silhouettes online store for ski figures to add to the wood board.  My vinyl present turned out great! 
You can find this awesome post linked up to the following Fantastic Parties:


Tuesday, April 16, 2013

Sweet Tooth Tuesday: Homemade Take 5

Want a yummy treat? Well I do I always love me some chocolate, caramel, peanut butter, and a little salt! I remember when my husband and I were dating and he introduced me to the amazingness of the Take 5. I would go help him on carpet jobs and if he ran to the store for a soda (feed his addiction) then he would bring me back a little treat and more often then not it was this. How we miss the days of impressing each other with treats or maybe it was just bribery for me to work quicker.......I will just believe it was to make me smile :) 


These are super easy to make you will need
Melted chocolate
Peanut Butter (I use creamy) 
Soft Caramel
Twisted Pretzel
Wax Paper/Parchment Paper


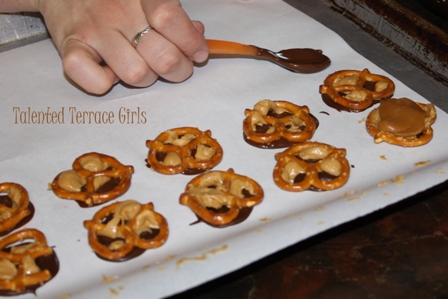
I didn't take a picture of the last step cause you just add a spoonful of chocolate on the top and then you get the finished look. I decided to spoon the chocolate instead of fully dipping the pretzels for the ease of this method. I used homemade caramel that we softened down to bite size by melting and adding some heavy whipping cream into the caramel until it was the consistency we wanted. We were making caramel for a salted caramel cupcake recipe and I wanted to try this too. 

Put a little bit of peanut butter in the pretzel holes. Smear a little chocolate onto the wax/parchment paper and while it is still melted place the pretzel into the chocolate so it will adhere together. Then take a small spoonful of caramel onto the top of the peanut butter pretzel. When you spoon the last of the chocolate onto the top you need to smooth it around so it is pretty and can connect the bottom chocolate together. 

Yes I used a baby spoon I liked the portion control I had. 


You can find this awesome post linked up to the following Fantastic Parties: