Saturday, October 22, 2011

Witch Party

Calling all Witches, calling all witches! Food, drink and witches brew. Now all we need it YOU. Stop by or park your broomsticks for a haunted Paparazzi Party. This is going to be so much FUN!!! This is a jewelry party and EVERYTHING IS $5. There is something for every witch. Come in your witch costumes and have some fun with witches from all over. Feel free to bring a friend. It will be the witch gathering to talk about.
When all the witches arrived on their broom stick they were to park them here.


Here are some of the Paparazzi products
SO SO CUTE!

Another fun touch to this party was the small mason jars that we used as cups.

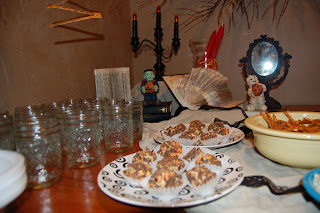
You can never have a party with out treats.
We had pretzels and some dips, warm wassel and some fun Halloween balls
Spookylicious pop tart
balls
I found these fun Halloween pop tarts at the store
1cup powder sugar
4 pop tarts
1 cup peanut butter
1/2 c butter, softened
Mix together peanut butter, butter on medium with an electric mixer until fluffy. Gradually add powder sugar and beat till combined. Finely chop the pop tarts. Make med size balls and roll in chopped pop tarts. refrigerate 2 house or until firm. ENJOY!

I ordered these cute broom sticks from Oriental Trading.
They were given to those who came dressed as a witch

This was my first year doing a witch party but we had so much fun that i think this may become a gathering to have every Halloween. I hope you guys have as much fun as we did. If you want to have a paparazzi Party for all the witches in your neighborhood then here is the information
check out Heidi on her face book page HERE.
She is so cute and got into the witch fun.

Friday, October 21, 2011

Foodie Friday : Couscous Stuffed Peppers

My kids love couscous, and when I saw this recipe, I knew that I wanted to give it a try.  Well, the idea was great, the ingredients the recipe called for were a little more pricier {ie. ground lamb} than what I wanted to spend.  So I decided to create my own little spin.

Want to see my version??

Couscous Stuffed Peppers
Find at least 3 good Peppers. It can be all Green {like I did, because they're cheaper}, and you can mix it up with some different colors. I say at least 3, but I had leftover filling that could probably fill another 3 peppers {although my extra filling was eaten by my kids, because they didn't want the peppers}.
Slice the peppers in half, and scoop out the seeds & ribs. Place them cut side down in a pan, and drizzle some EVOO over the top.
Let them roast in a 450 degree oven for 15 minutes.
Meanwhile, chopped half a onion & mince 2 garlic cloves.
In a pan, cook up a pound of hamburger {or turkey burger-that's what I used} with the onion & garlic.
Add some salt & pepper, and because I was using turkey burger, I decided to add a couple sprinkles of poultry seasoning.
When the meat is browned and the onions have softned, add a can of chicken broth. Bring to boil, and add a box of couscous. Turn off the heat, take the pan off the burner, and cover & let sit for 5 minutes.
During this time, my peppers were done roasting, so I took them out and let them sit on the counter. See the blistering starting to happen??? Perfect.

After the 5 minutes, mix up the entire meat/couscous mixture. Scoop & fill each of the pepper shells. Now you could stop right here, but I decided to give it a little something extra. I sprinkled some parmesan cheese on top, followed by a sprinkling of parsley. Stick the pan back into the oven and let it bake for another 15 minutes {this is too make sure the peppers really cook-I like my peppers nice and soft}.
And that's that. A delicious dinner worthy of the exclamation "Yummo!".
My kids completely devoured this. My oldest son ate three servings of the stuffing. I loved the stuffing with the pepper-it was delicious!
I hope you try this out. Enjoy!

Thursday, October 20, 2011

DIY Thursday : Applique Tie Onesie

 Sunday, my Sister-in-law made a comment {kind of jokingly} that she wanted me to make baby Hudson some cute little onesies with a tie on it.  I kind of laughed, and proceeded on with the night.

Then while I was perusing blogs, I saw a post on applique ties, and I thought it was fate-I was suppose to make some cute shirts.

And boy did I :)


Darling isn't it :)  And soon enough I 'll get some pictures of a cute baby wearing these cute little shirts.

Want to make some?  Here's how I did it:

Applique Tie Onesies

First, head to the store and buy some plain onesies.  I got mine at Ross's....which is a pretty awesome place to get cheaper baby clothes.


Second, grab some fusible interfacing.  You can usually get a good-sized roll for a good price using coupons at Joanns {or somewhere like that}.  I printed out my tie pattern here.  I took some leftover scraps {that were boyish} and ironed them to the interfacing {shiny-bubbly side to wrong side of fabric}.


Next, I layed the pattern on the fabric, and cut it out.  Then I peeled the paper, and layed it down onto the onesie.


Before completely ironning on the tie, I tucked in the bottom of the tie into the "knot".  Then with a good warm iron, I ironned everything on good & snug.


Then, for added measure, I sewed around the entire tie.


And that's it.  One cute baby gift.  And it was super easy.  And it only took me 30 minutes to put together two of these onesies.


My Sister-in-law loved these!  I'm very excited to see my darling nephew wear them :)

Wednesday, October 19, 2011

Wildcard Wednesday: Spooky Glam Halloween Wreath

Hey friends!!!
Thanks so much for voting for my wreath!
I saw it & fell in love! So here is how I did it...
I bought a wicker wreath at the dollar store. Super cheap =)

I bought roses at the dollar store also, pulled them off the stems and started hot gluing them onto my wreath.
Here I am halfway done!
I placed my roses really close together cause I liked that look better, but you can put them on looser. Just depends on what you like =)

Here it is with all of the roses. I really liked this look too & might do another one with light pink roses for spring....I'm still contemplating that one.

Then I bought the cheapo black spray paint from Lowe's. It cost 97 cents!

Then I had some fun sparkly green ribbon & made a bow. The skull I got from Joann's.
I love it! My Mom says it looks like a wreath you would see at Disneyland on the Haunted Mansion! That totally made my day =)

All of the wreaths were so amazing & I feel so honored to be chosen!
So go out and make a super fun Halloween/Fall wreath (you have at least 8 options to choose from!)

Tuesday, October 18, 2011

Pumpkin Candy Corn Popcorn Balls

Here is a repost from my other blog... it's one of one of my new favorite Halloween treats! It's super yummy!
I recently learned that you can use candy corn (and a little butter) to make popcorn balls (Thanks to my mother in law). I also saw this recipe for pumpkin shaped popcorn balls from Bee in our Bonnet (spotted this one on Pinterest!) that are super cute.
So I thought... what the heck? Why not combine them into one glorious treat? And so I did! And they are SCRUMPTIOUS! And besides the taste- the ingredients for this recipe will appease all you budget minded people out there!
Ingredients:
marshmallows and butter not pictured....
1 9 oz. bag of candy corn (bought at the dollar store)
1 bag of microwavable popcorn (we didn't have any popcorn kernels- or we would have gone the homemade route!)
Butter (about 4 tablespoons)
Handful of mini marshmallows
Tootsie Rolls (bought at the dollar store)
1 Green Apple Airhead Candy

 Directions: Make the popcorn. Place popcorn in bowl and toss in a handful of candy corn.
Over medium heat, melt butter and the rest of the candy corn. Stir constantly!
Pour the hot (I have to add that adjective because I kept burning myself!) melted candy corn over popcorn.
It was at this point when I realized I needed a little more STICKINESS. So I ran back to the stove and melted a handful of marshmallows with 2 tablespoons butter. I quickly then poured that mixture on top of the popcorn/candy corn. (It might be easier to just melt the marshmallows and candy corn together at the beginning ... but I am not a chef and I don't know if that would completely mess up the entire recipe!)
Carefully (because of the heat) form popcorn into balls.

My hands were getting burnt at this stage so there are no pictures...

Form several leaves from the Airhead Candy (I threw mine into the microwave for 5 seconds to soften it).
Place candy leaves and unwrapped tootsie rolls on top of your popcorn balls to complete your pumpkin look!
Can you spot that large chewy candy corn inside the popcorn ball? Biting into those pieces gave it an extra sweet taste!
Some of the popcorn balls got a "spray tan" with orange food color mist. It was a nice touch, but not necessary!
These were simple, fast, and purely delicious. Enjoy!


Confessions of a Stay At Home Mommy