Thursday, August 18, 2011

Black Bean Enchiladas

These are SO GOOD! Last year for our family reunion, our family got together and made a family cookbook. This is my cousin's recipe, and they are DELISH! I did alter the recipe slightly. Her recipe calls for low fat, or fat free cream cheese. I went naughty and used regular. Fantastic!

INGREDIENTS

1/2 c. chopped onion 1 taco seasoning packet

2 minced garlic cloves 15 oz. can drained black beans

3/4 c. bottled salsa 1/3 c. Cream cheese

4 oz. shredded Cheddar 12 6-in. flour tortillas

1 10oz. can Enchilada Sauce

Cooked chicken or Beef

*Preheat oven to 350!

Heat a nonstick skillet with olive oil, and saute onion until tender. Stir in seasoning packet, garlic, beans and cooked meat, and cook 2 minutes. Stir frequently.

Stir in salsa and cook 1 minute longer. Remove from the heat and add cream cheese and 1/2 c. shredded cheese, stirring until cheese melts. Spread 1/3 c. enchilada sauce in the bottom of a 13x9 pan. Spoon about 1/3 cup mixture down the center of each tortilla and roll up. Arrange enchiladas and sprinkle with remaining cheddar cheese. Bake for about 25 minutes or until thoroughly heated.

**I tweaked this recipe by adding some canned corn, and tomatoes from my garden, then topped with a dollop of sour cream when they were done.**

Wednesday, August 17, 2011

Gluten free BBQ sauce


Okay, so it has been a while since I got on to do this. My most sincere apologies to those who are looking for more GF food ideas.

I have had a hard time deciding whether to share this recipe or not. It is one that I have made several changes to, over the years to make more my own, so here goes.

ANDREA'S GLUTEN-FREE BBQ SAUCE

1 Tbsp. Santa Cruz Organic Lime Juice
1 1/2 c. Organic Ketchup
1 Tbsp. Liquid Hickory Seasoning(Worcestershire Sauce, check the labels)
1/2 tsp. sea salt
1/2 tsp. dry mustard
1 tsp. chili powder
1 tsp. paprika
1 Tbsp. Agave Nectar(or the same amout of regular suger, honey, xylitol, etc.)
1Tbsp. Ground BBQ Blend (by Simply Organic)
1/4 tsp. garlic powder
1/4 tsp. ground ginger
1/2 tsp. ground oregano
1 tsp. parsley
1 Tbsp. Minced onion
2 c. leftover roast meat, or 1-1 1/2 lbs ground meat(if you are making sloppy joes)

For sloppy joes, heat sauce and meat together and serve on a toasted bun. Makes 4 servings.

* I also like to use this as a sauce on ribs, dutch oven/crock pot chicken, etc.

BBQ DUTCH OVEN CHICKEN


SLOW ROASTED BBQ RIBS

*These babies had a homemade dry rub put on them first. The sauce was brushed on toward the end of the cooking cycle.


Tuesday, August 16, 2011

Tips on what to wear for family pictures

Are you getting ready to get your family pictures taken? What to wear? It's the number one question photographers get asked.

As an overall rule, treat everyone's clothing as if it were all one outfit.

1. Pick an Inspiration Piece

· Start with a single piece of clothing that you want in the photos (a scarf, a skirt, dress, pair of shoes, etc.) as your inspiration piece.

· Select the rest of the clothing/accessories to compliment that piece.

· You want to shy away from matchy matchy. Like all the same color shirts. Mix it up with colors, patterns and textures that allow each individual to be unique, yet complement one another.

· With this as your goal, layout the inspiration piece and then go to e

ach person's closet and see what you can find. lay it out on a bed and see if anything jumps out at you and looks off.

2. Think Color

· Color makes the picture pop and can bring the focus to the family instead of the background

· Ask yourself where it will be in your house? consider the colors of the room.

· check out your favorite clothing stores and see what the mannequins are wearing. Keep in mind what color combinations are ‘hot' right now.

.look for colors that are in season, you will be able to find them easier in stores

· Try playing with about three colors. Try to have each color show up at least three times throughout the picture.

· Find inspiration from lots of sources. Look at home décor magazines, floral bouquets, fashion magazines etc. Choose a color pattern that speaks to you

3. Layer, Texture and Accessories

· Layering adds more color and texture to the photo. I love this one, it is one of my favorite to see in pictures. It gives the picture a little extra and pulls the picture together.

· Try to find clothes that have some sort of texture to them (this could be ruffles, knit, cuffs, stitching, embellishments, or layering of shirts, etc.

· Layers and accessories gives you the option of shedding or adding pieces to create a new look.

4. Remembering the Little Things

· Pick clothes you feel good in. You don't want to be pulling at your shirt the entire photo shoot. make sure you can move, hug and play with your family.

· Make sure nails are clean and trimmed (don't forget the kids!), your clothes are ironed, your kids' temporary tattoos are removed…you get the idea!

· Don't forget about the shoes either, they can add to an outfit or draw unwanted attention to the bottom of the photo. Your feet WILL show!

· Make sure pants are long enough.

· Try to stay away from white shoes.

Props

.props are always a fun thing to make a picture your own and unique. Think of what your family likes to do or something that has been passed down in the family. Think of what your kids like, their favorite stuffed animal, toy, something that is their favorite color, etc.

I hope these tips help you as you get your family ready for pictures. This is a great time to get them taken. Whitney Swapp Photography has a deal going on right now for family pictures.

Family Package

$95.00- traditional family portraits, 3 poses for each child, mom and dad, siblings. This package includes up to 4 children additional children $10.00 each

check out the website here

Monday, August 15, 2011

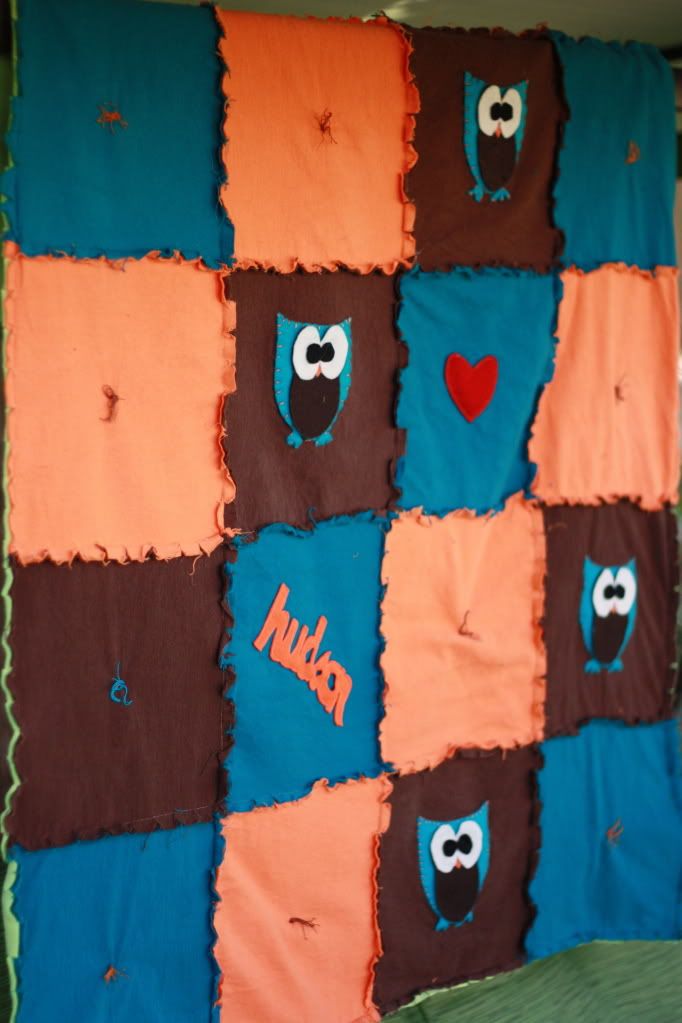
Cute Owl Rag Blanket

I've got a nephew coming.......I'm super excited to hold this little bundle.
Years ago, I started making Rag Blankets for each new Niece/Nephew. It's something that I can do up quick, and combine some in-store sales & coupons, I can make a great homemade gift for cheap :)

Here are some pictures from past gifts:


But this time, I didn't feel like cutting out a bunch of 5x5 squares, so I opted to cut out 10x10 squares. Here's how it turned out:
So stinking cute!
I walked into Joann's, and when I saw the turqoius flannel, I knew that would be the base.
I even cut out his name & stitched it on. Let me tell ya...that's true love right there, it was hard cutting out that piece.

Besides cutting out the owls, I also added a little heart, so Hudson knows his Aunt Nae loves him :)


I gave the blanket to my SIL & told her that the baby could come anyday now..lol :)


What to make one of your own.......

Here's what I did:

Fabric = 2/3 of a yard of three different colors fabric {or 4 if you want}
-Cut 10x10 squares, and layout your pattern
Backing = 1 yd of 58" wide fleece
Owls = 2 Sheets of Felt for the main body; 1 Sheet for the Tummy; 1 Ivory Sheet for the eyeballs; 1 Black Sheet for the pupils; 1 Orange Sheet for the Nose

Print off 3 copies of the picture below {I printed off 4x6 size}:
I cut out the main owl, the tummy and eyes together, and then just the eyes. I glued all the layers together, and then stitched it onto one of the fabric squares with floss.

Sew the squares together, making sure you sew the wrong sides together {in order to make it a rag blanket. I sewed everything using a 1/2 inch seamline.
After everything has been sewn, lay on top of your backing fabric, and cut the backing fabric to size. I then pinned everything, and took some floss & tied some of the empty squares.
Sew around the edges. Take some small, but good scissors, and start cutting into the fabric. Rinse in the washer, and then throw it into the dryer.
And there you go, your own rag blanket!

Saturday, August 13, 2011

Woodland Baby Shower


A Baby Boy is coming to play in our neighborhood so we had a PARTY!!!

 
I know it is weird why did we take a picture of the presents and post it?? just to show you how cool we all are?? No!! So you can see that quilt, it is from Babies R Us and the mom to be Heidi decorated her room in this theme so we wanted to match the theme for her shower. Now let me just explain Jill and Teresa don't do cute really well okay we enjoy it but dont seem to "DO" super cute for our things, but Whitney on the other hand always does cute (for example her little girls 1st birthday party). So when you put us 3 together it might get to be a little fun!!

Look at the diaper cake-Diapers are from target then Jill got some fun ribbon to wrap it in. we used our cupcake toppers for some of the decorations on the cake and also some AMAZING woodland creatures that I (Teresa) hand sewed. We then set the cake on top of a SWEET stump that Jill's dad just had laying a round his house. (thanks Jill's dad for the awesome stumps)

Games-1-Guess how many diapers are in the cake winner gets a prize. Easy game to play as people are arriving to the shower. 2-Attendees also brought a baby picture of themselves so we played guess who the baby is. 3-Present Bingo as the Mom-to-be opened her presents there was a number on each one and people would cross it off their Bingo cards. We gave people blank Bingo cards so they could write their own numbers so we didn't have too many numbers and not enough gifts to use it with.  We keep the games simple as we had a range of ages and Heidi doesn't really like games herself.

These frames area fun decoration for a cute woodland nursery. I (Whitney) bought some shadow boxes at Ross or you can find them at a craft store. Find scrapbook paper that coordinate together for the back ground. I found some woodland creatures on the internet and printed them on photo paper and used glue dots to put the animal on the front glass part of the frame. 

(Whitney)
Fresh Garden Salsa 
4 medium size tomatoes, chopped
1 green bell pepper, chopped
1/2 cup chopped onion (if it is a stronger onion then do less)
cilantro about a palm full , chopped
salt and pepper
2T oil
1/4 cup apple cider vinegar
I love vinegar so when i make it i put about 1/2 cup in it.

Sweetened Condensed Milk=Yummy caramel
Take 1 can or 3 cans of sweetened condensed milk place in a crockpot with about 1-2 inches of water. Turn on low for 6 hours. DO NOT over cook for lets say 9 hours or yours will look as ugly as mine (Teresa's) did. It tasted fine not amazing like it normally does but we all ate it and enjoyed. Thank you Crystal for reminding me about the recipe and making it so i could try how fantabulous it tasted before i tried it myself :)


CUPCAKES!!! I know we think you must have cupcakes with everything and it might be true. This recipe can be found here. The cupcake toppers were downloaded from here yes they cost a little bit of money but it was well worth it as you can see they were used for the cupcakes and for a couple of the cute frames.

I (Teresa) am learning that I LOVE to handstitch i almost like it more than my sewing machine so i will just let my husband use that and i will use the needle. We bought the pattern for these cuties here. The small ones are the original size and the big were enlarged on the copier by 200%. I got the felt at Michael's and i liked that they had a variety of browns so i didn't have to use the same on any of the animals.